Showing posts with label diy. Show all posts
Thursday, July 19, 2012
Baby Quilt!
The quilts I have made before consist of two sheets put together with batting in between and then tied together. So this was a new adventure for me! I keep wanting to sew clothing, but it seems a little daunting. A quilt was a little safer.
I was shopping around trying to find fabric, and after a couple of hours I finally found what I wanted to use! A cute zoo print, with a golden yellow, turquoise and white polka dot, with a multi-colored striped backing.
I have been searching and searching, finding cute quilt tutorials, and right as soon as I thought I had one, I found the right one! A cute, simple pattern. So here we go!
Supplies:
Warm & White Cotton Batting 34"x45"
1.5 yards backing fabric
1 yard Main fabric (zoo animals)
1/4 yard second fabric (golden yellow)
1/4 yard third fabric (turquoise with white polka dots)
cutting mat
rotary cutter
clear cutting ruler
scissors
curved safety pins
thread (I used dark brown Gutermann)
1. Figure out the size that you want! After washing (don't forget to pre-wash all fabric and batting!), my batting ended up being 34"x47" (I don't know why it was larger, maybe it got stretched while drying), so I wanted my quilt to be the same size. I wanted the yellow to be 6" wide (cut 6.5" allowing for seam allowance), turquoise to be 5" (5.5" with seam allowance), and 24" for zoo animals (24.5").
2. Cut your pieces! I have trouble making a nice square of fabric, so I found some help about how to true up a piece of fabric and to cut nice strips. Check out the video that I found! I cut 2 pieces of yellow that were 6.5" wide and not cutting a length. 2 pieces of turquoise that were 5.5", and one piece of zoo print that was 24.5"
3. Sew your pieces together! I started from the middle out. Pinning right sides together of the zoo print with the turquoise, using 1/4" seam allowance. Once those were done, I pinned the right sides of turquoise and yellow together and sewed the same.
4. I then laid my finished top down with the batting on top and cut the top to size. I also ended up having a couple of inches of batting hanging over the top so I trimmed that also.
5. Cut backing to size! I trued up my fabric and cut the ends to be true. Then I laid the backing down with the batting on top, 2" away from 2 sides and cut the other sides. I left 2" hanging over on each side so they could be folded over for the binding. So my backing size was about 38"x51" (I didn't measure it...)
6. Lay the top and pin it with curved quilting safety pins. For the binding, I used a variety of different sites to help me. I used this for the basic of what I wanted to do (a fold over binding), then this to help with the mitered edges. This was a great website that had a list of a ton of different helps for finishing a quilt!
So! I folded each side over 1", then folded it over the quilt and pinned. At the corners, after folding it, I unfolded it, and, 1" away from the corner, I cut the fabric at a 45° angle. I then folded one edge over to create a triangle, then folded it over on top of the quilt. I am sure there is a much better way to do this, but being my first quilt, I just went with it! There wasn't a ton of bulk at the corner, so I figured it would be okay.
7. Sew around the edge with a 1/8" seam at the inside of the blanket. Once gone around, go back and sew the mitered corners.
8. To hold it together, I decided to sew a grid instead of tying it. I sewed 6" grids. sewing in the seam (stitch in the ditch) of the yellow to turquoise, and turquoise to zoo animal, and then grids on the zoo animals.
And all done! I finished this in one day! I was surprised with myself. And honestly, I wasted time so I am sure this could have been done way quicker. Oh well :)
Sunday, July 8, 2012
Tower of Herbs!!!
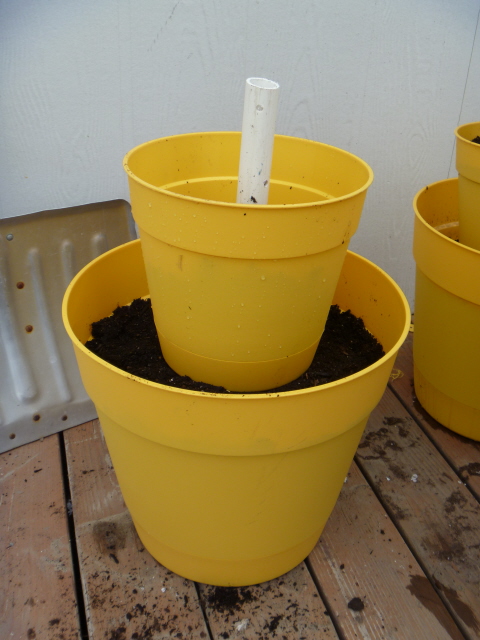
I didn't make mine quite the same as hers. I did not want to use terra cotta pots (they soak up too much water from the soil), and the pot turned upside down inside another pot did not work very well for the plastic pots I found (at Wal-Mart). So, some tweaks I made were :
1. Used plastic pots instead of terra cotta.
2. Used more soil (about 1 and a half bags).
3. Added a PVC pipe with small holes drilled in it as a way to add stability to the pots, along with a way to water the herbs without dumping water on top of them. This idea came from my younger brother. He had done something similar with a large wine barrel used as a strawberry planter.
So here we go!
Supplies:
2 - 6" pots
2 - 10" pots
2 - 15" pots
2 - 22" lengths of 1" PVC pipe
2 bags of soil (I used Miracle Grow, 16 quart bag)
Power drill with 1 1/4" drill bit and 1/4"
A partner in crime! (I used my little brother)
Seeds! (I used sage, thyme, parsley, oregano, chives, and basil)
1. Using the 1 1/4" drill bit, drill holes in the bottom center of your 10" and 6" pots.
2. Cut your PVC pipe to the length you would like (I used 22" so it stuck out of the top somewhat).
3. On your PVC pipe, marks dots every 3 inches.
4. Using the 1/4" drill bit, drill small holes at these dots for water flow. I alternated where the holes were drilled by turned the pipe 90° each time I went to drill a hole.
5. Gather everything and put it together!
6. Placing the 15" pot on the bottom (no hole has been drilled in it), have your partner in crime hold the PVC pipe inside the pot in the middle as you dump soil around it. Add soil until it is filled about 2" from the top of the pot (the soil will settle).
7. Take your 10" pot and slide it over the PVC pipe so that the pipe is sticking up through the middle of it, and place it on top of the soil in the 15" pot.
8. Fill it with soil and add the 6" pot.
9. Fill the 6" pot with soil.
10. Plant your seeds! I made 2 towers with sage (in the top pot), thyme (middle pot), parsley (bottom pot) of one tower and oregano (top pot), chives (middle pot), basil (bottom pot) of the second tower.
Finished!!!
As of today, July 8th, I have herbs popping up in each of my planters! I can't wait until they are fully grown and smelling delicious!
Sunday, April 22, 2012
Apron Time!
A dear friend of mine had a birthday last week, and since he cooks frequently, I thought it would be a nice gesture to make him an apron! I looked and looked for different tutorials on how to make an apron and found this one and also this one that I thought would be great helps. In the end, I used them a bit but ended up doing my own thing. Really, what I needed the most help with was just figure out how long to make the neck strap and the waist ties.
I was really worried about the pattern. I wanted to find a free pattern online but didn't really like any of them that I came across. In the end I took an apron I had at home, folded my fabric in half lengthwise with the apron (also folded in half lengthwise) on top of it, and traced it, giving it an extra inch all the way around for hemming. I also added a pocket that was 7"x12" (8"x13" to give it a hem).
Doubling over the edges, I sewed a zig-zag stitch all the way around. Well, first sewing the bottom and arm areas, then the top and sides just so everything was folded over nicely. The tricky part was figuring out what to do with the backside so the neck strap sewn area wasn't ghastly. I took a rectangle the same length as the top of the neck area, and 2" wide, folded and pinned the hem, and pinned it to the back of the apron to cover the neck strap sewn part, and sewed it all together.
Cotton twill tape was used for the straps, and fold over and sewn using a zig-zag stitch so they will not come unraveled (hopefully!).
It took me a while to get this project done (probably about 3 hours) just because I am so slow and unaccustomed to sewing a lot and did not want to screw up! But all in all, I think it turned out well :) I have yet to hear if he likes it and will use it. And silly me, I was so excited to get it sent off that I did not take pictures of it...the picture you see is that of the fabric that I used. Fun and kitchen-y, and I figured it was unisex :)
Along with apron sewing, I have more baby shoes I have made, and a dress and diaper cover that have yet to be put together! So pictures and post of those soon :)
Sunday, March 25, 2012
Scripture Case Tutorial
So, I am cruising around on Pinterest (like I need another time waster...) and I come across a scripture case tutorial, and it reminded me of the tutorial I used for my own scripture case and figured I would share!
So sometime last year, after lots and lots of thought about making a scripture case, I found this tutorial and decided to try it, with some modifications. I used the concept of using the flaps to hold each side of the scripture case, but decided I didn't want/need handles, but I did need a pencil holder, and I did want it to folder over and button on the front. I was in a gray and yellow phase at the time. And I really wanted to use some buttons from my vintage button collection. Because I have a lot of wonderful buttons. :)
After a year of use, I have several modifications that I would like to make, such as make the button holes be perpendicular rather than vertical. Also some size mods. I have been thinking about remaking it for a while now and have yet to do it, I am sure that will be a future post :)
Tuesday, March 20, 2012
Baby Ballet Shoe
I am always stumbling across cute tutorials, and finally was able to make these adorable shoes! I found the tutorial here. It's a very simple tutorial, with not too much explanation of what is going on, but it does have some pretty good pictures to help along the way.
As you can see with my shoes compared to those on the tutorial, my ruffles aren't too ruffly :(. First off, I had trouble making my ruffles. It took a lot of trial and error (meaning a lot of seam ripping) to find the right settings. I have a basic, cheap Singer sewing machine, model 2932, so for the ruffles I had to use the settings: tension 9, length 0, width 4. It finally gave me some pretty good ruffles, but then when I put them on the shoe I had to flatten them out a little to extend all the way to the edge of the shoe to be sewn. I also did not put the ruffle up to the top of the shoe as the tutorial says, that was a mistake made when I placed the bottom ruffle on, I put it too far down. So next time, I will attach the ruffle where it needs to be, but I might also make the ruffles "tubes" a little longer so that I ensure I can have some good rufflage going on, and so that they extend all the way to the edge.
One HUGE thing that hung me up when making these, was that the tutorial does not show how to turn the top of the shoe from inside out to right side out to be able to attach the ruffles. I had a lot of trouble with this. I finally figured out to snip the curve every so often, that allowed me to turn it right side out better. Then I pinned it and ironed it flat.
I am glad I was able to get these made! And figure out how to get over the troubles I was having! Now I am amped to make another pair! Maybe this time with some cute cat fabric I found :)
Thursday, March 8, 2012
Herringbone Painted Coat Hook
This is project I have been wanting and needing to do FOREVER. I have been using one large Command Sticky hook in my closet and hanging a billion jackets on it, and knew something needed to change. Originally I wanted to use vintage hooks/door knobs, and found a lot that I liked, but not a lot that I thought would work with my room. (I should say that I am by far, NOT a great interior designer, I leave that to my sister, but, when I have an idea in my head it's hard to go against it.)
This past weekend gave me the opportune moment to get this made! I thought about a couple of different designs; a true chevron pattern, hexagons (I love geometric things), and this offset chevron pattern (herringbone). The color choices were down to yellow and green, and I found this green color among a big bucket of craft paints that I have, and it worked perfectly! I was left to get a wooden plaque from Craft Warehouse (an obsession of mine), along with some hooks they had on sale.
I don't have a step by step for this because it's not super difficult at all, the main part was getting the pattern on there, which I am sure could have been done some easier way!
The plaque needed to be painted the base white first, along with the hooks, so while that was drying, I figured out my shape and got that all ready.
I played around with shape size on Microsoft Publisher by making a true square, split in half with a diagonal line, then paired with another square that was made the same way so that, if the middle line between the squares was gone, there would be a diamond shape. I printed out a few to get the size that I wanted, cut it out, and used it as a template to make a sturdier cardboard template. I then used that to draw on 2" painters tape, however many diamonds that I needed (in my case, 28 total, 14 shifted to the left and 14 shifted to the right). I know there is an easier way to do this, but I didn't have the means to make my own stencil, and I couldn't find a pre-made stencil that I liked enough to use...
Once I had all the diamonds cut out, and the white paint was dry, I started placing the tape diamonds on, placing one, then using a ruler to make sure the next one was as even as possible. I continued doing that until the whole plaque was taped up, then got out my green paint and went for it!
I finished it off, along with the hooks, with a clear coat matte spray, then attached the hooks and had some help attaching it to my wall. I am pretty pleased with it, and it helps my closet not feel so full!
Tuesday, February 21, 2012
Knitted Baby Pixie Hat Tutorial
So, as my previous post talked about, I wanted to make a cute baby hat. My initial idea was to crochet, but I couldn't find a cute enough pattern for the project, so I turned to knitting, and also so I could use the knitting needle kit I got for my birthday :)
So I found a honeycomb knitting pattern. There are a lot of good sites out there that direct you to free knitting stitches. For the life of me I can't remember where I looked.
I struggled a lot about what size to make the hat, since I don't have a baby of my own for size reference. And it was hard for me to find information! I did find this site however, that was helpful as to head circumferences. So I just guesstimated length and height, which ended up being 6" x 7.5". Hopefully it fits right! It seems a little long....
Anywho, with all this in mind, I transformed it into a hat, as follows:
Materials:
Lion's Brand Vanna's Choice Medium Weight Yarn (I used the Mustard color)
Size 9 (5.5mm) Knitting Needles (long or circular)
G4.00mm Crochet Hook
Cable Needle (I used a size 10 knitting needle)
Yarn Needle
Abbreviations:
p (purl)
k (knit)
sl (slip)
sts (stitches)
cn (cable needle)
RS (right side)
WS (wrong side)
Stitch Explanations:
4-st RC ( sl 2 sts to cn and hold to back, k2, k2 from cn )
4-st LC ( sl 2 sts to cn and hold to front, k2, k2 from cn )
Pattern:
Cast on 38 sts
Ribbing:
Row 1 (WS): P3, K1, *P2, K2, Repeat from * until 3 sts left, then P3
Row 2 (RS): K3, P1, *K2, P2, Repeat from * until 3 sts left, then K3
Row 3: Repeat Row 1
Row 4: Repeat Row 2
Row 5: Repeat Row 1
Begin Pattern:
Row 1 (RS): P3, *4-st RC, 4-st LC; repeat from * to last 3 sts, P3
Row 2 and all WS rows (rows 4, 6): K3, p to last 3 sts, K3
Row 3 and 7: P3, k to last 3 sts, P3
Row 5: P3, *4-st LC, 4-st RC; repeat from * to last 3 sts, P3
Row 8: Repeat row 2.
Repeat rows 1-8 10 times then repeat ribbing, bind off.
Now to put it all together!!!
1. Crochet the hat together:
- Folding it in half, inside out, start at the bottom corner of ribbing. Using your crochet hook, insert hook, pull a loop of yarn through, chain 1. You will have a loose string of yarn that you will need to tie off and weave end in with yarn needle.
- Place hook in next stitch opening of both sides of hat, single crochet 1, then chain 1.
- Repeat till you are at the top of the hat (I have 24sts), then slip stitch again in last stitch, tie off, and weave end in.
- Cut 3 pieces of string, each about 30" in length.
- Using crochet hook, place in empty place in bottom front corner of hat from RS to WS (somewhere close to the edge, but not so close it will stretch hat out), pull all three strands of yarn through to make a loop, place all 6 strands into loop and tighten. You have just made a larks head knot!
- Split the 6 strands of yarn into 3 - 2 strand sections and braid until you get about 3 inches from the end, or as long as you would like. Tie an overhand knot and tighten.
- Repeat on other side of hat, make sure each side is the same length, and try to tie knot at same length. Hold each side next to each other, trim yarn to be same length.
Subscribe to:
Posts (Atom)